My Katana 60 mechanical keyboard
An account of my own keeb build

The search for a mech keyboard
Some time ago reading some hacking sites on the internet I saw an article talking about how awesome it is to type on a mechanical keyboard, since then I saw mech keyboards mentioned everywhere.
My first idea was to go the easy route and get a prebuild mechanical keyboard, I had no idea which switches to choose, what a customizable mech keyboard could do or the great world of custom-build mech keyboards.
Choosing the size and distribution and other extras
I soon learned some aspects critical to a mechanical keyboard are its size and distribution.
Size
This one was quite a revelation! Not every keyboard has hundred-and-something keys and a Numpad (I love Logitech's K120), many mech keyboards I saw were on the smaller size.
Here's a almost-comprehensive outline form onsitego:
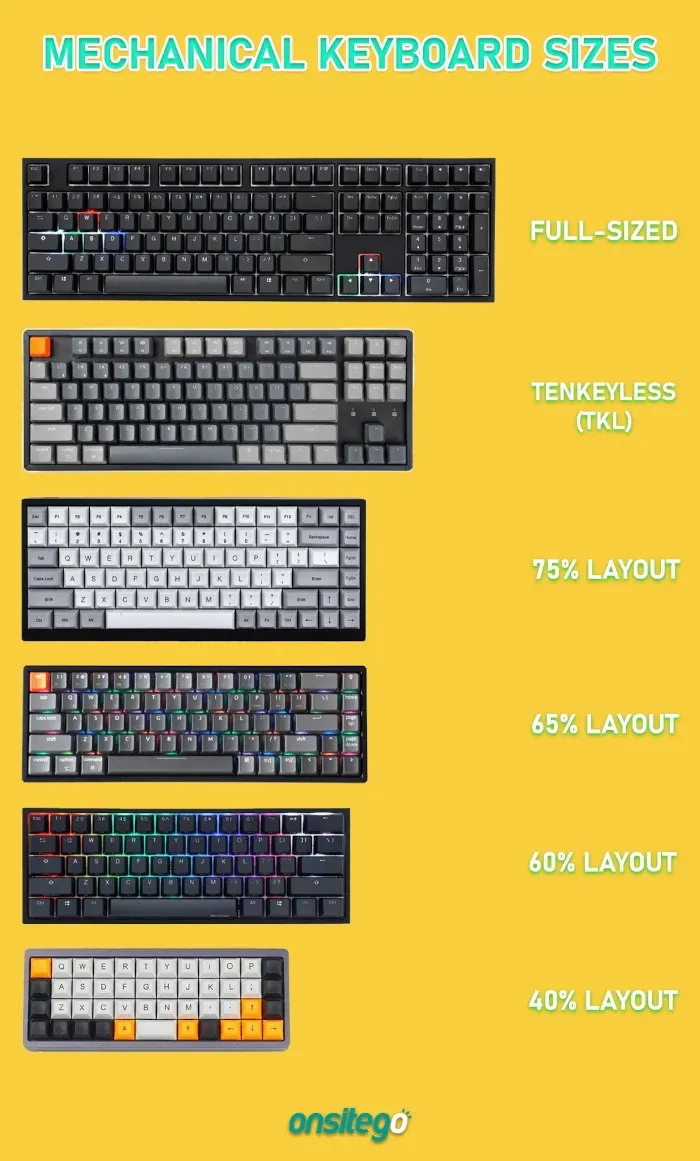
The layout I preferred were the 75% or 65% ones. Losing the arrow keys was a no-go for me and he function keys are a nice extra for IDE shortcuts.
Key distribution
One could say there are only two distributions: ANSI and ISO. There are surely some others, but these two seem to dominate the market.
The ANSI distribution is the American one, and the ISO is used mostly in countries located in the EU. Each country having its own ISO variation (ISO-ES, ISO-FR, ISO-IT, ...)
Here's an image from wikimedia displaying both layouts:
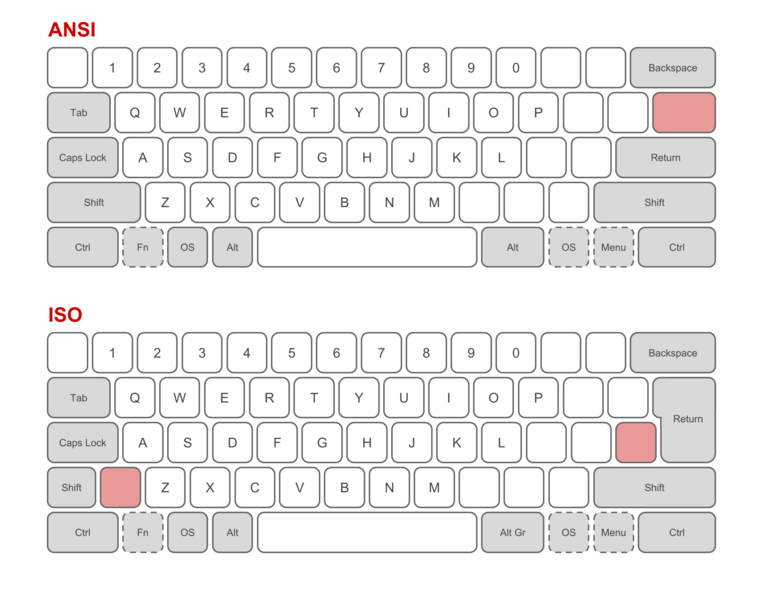
Even though I'm based on an EU country I wanted to get an ANSI keyboard, as I had heard from some programmers in my country that this simplified programming. That's because generally programming languages use symbols that are more easily accessible in an ANSI distribution. In most ISO distributions one has to use key combinations to get those symbols.
Additional extras
Mech keyboards normally have some extras only seen in premium keyboards (may they be mechanical or membrane ones), like key backlightning, RGB LEDs to show off, or some extra function keys. Some keyboards also allowed firmware modification using QMK.
I didn't need any of them, although key bakcklightning would have been a nice extra and custom firmware an incredible addition.
Finding the perfect keyboard
So, with a layout and distribution in mind I started looking for keyboard shops. Finding an online shop based on Europe (to avoid import taxes and tolls) was quite an adventure.
But in the end I located https://mykeyboard.eu/ and https://candykeys.com/. The thing is, mech keyboards seem to be such a wanted item that those shops hardly had (and have) on stock the keyboards I laid my eyes upon.
And which ones where those keyboards? Well, my favourite one was the Varmilo VA87M Panda, a beautiful TKL keyboard.
The Vortex RACE 3 was also a very strong contender, a compact (although slighlty boring-looking) 75% keeb.
But in the end I didn't get any of the ones I had lined up. What happened?
Keyboard kits and DIY
Looking through candykeys catalogue for the Nth time I stumbled upon their DIY keyboard kits section. And OMG, that was exactly the way I like to roll! even though my maker-fu has a long way to go I dig building my own devices, and having a sort of path laid upon to help me build a fully custom mech keyboard was a great opportunity.
Building a custom keyboard consists on getting all components that make up a keyboard and assembling and soldering them together. Those components are:
- A case to put the keyboard into an protect it's most delicate components
- A PCB where the key connections are printed and connect to the CPU (the keyboard's brains)
- A metal plate to add robustness to the build
- Many, many switches, the electro-mechanical components which convert the finger taps into electrical signals which get converted to symbols on the computer
- Keycaps, the plastic bits that are mounted on the switches and are tapped
- Stabilizers some metal wires and plastic bits that help anchoring the bigger keycaps so that they don't fly away when pressed
I quickly got a crush on KBDFANS' KBD67 MKII keyboard, but all of it's main components were not on stock and my patience was already pretty depleted.
And this way I found the Katana 60 v2 keyboard.
Katana 60 v2
The Katana 60 v2 was a bit of an imposing keyboard which seemed difficult to get used to, given it's small size and unique key distribution. It's based on the SemiErgo Layout, based on a 60% size keyboard, reducing stress on the wrists.
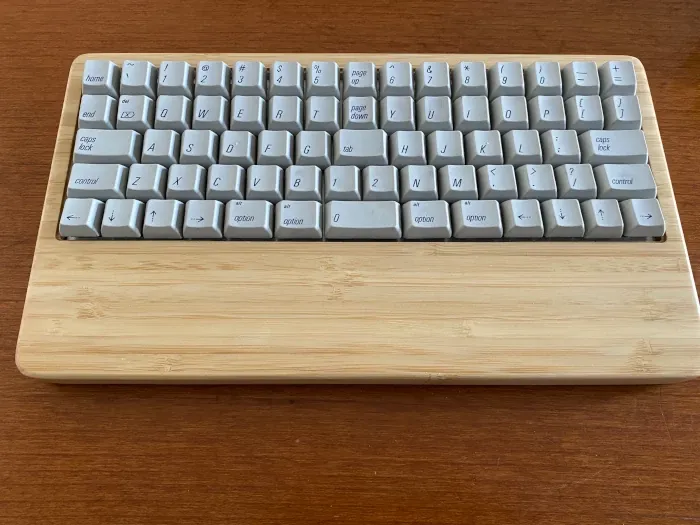
RominRonin was the brave one designing a PCB to translate the SemiErgo concept to the real world, resulting in this beautiful keyboard. Even though I slightly feared such a drastic change (from a 100% ISO keyboard to this), I loved the idea of having such a distinctive keyboard.
I ordered the PCB and plate through candykeys, switches (gateron browns) and stabilizes through mykeyboard.eu and the cheapest case and keycaps i found on Amazon.
LED mod
While waiting for everything to arrive I fantasized with the idea of adding a RGB LED to the keyboard as a status indicator for caps lock and other functions. And I found this mini-guide from a Reddit user.
But there was a problem, this user added the LED to the Katana 60 V1 board, and I had the V2 with some slight modifications. Thankfully the Katana 60 being an open hardware keyboard I downloaded the Eagle files from its repo and found the PCB traces I could solder some wires to to get the LED working.
As soon as I received the PCB I added the LED:
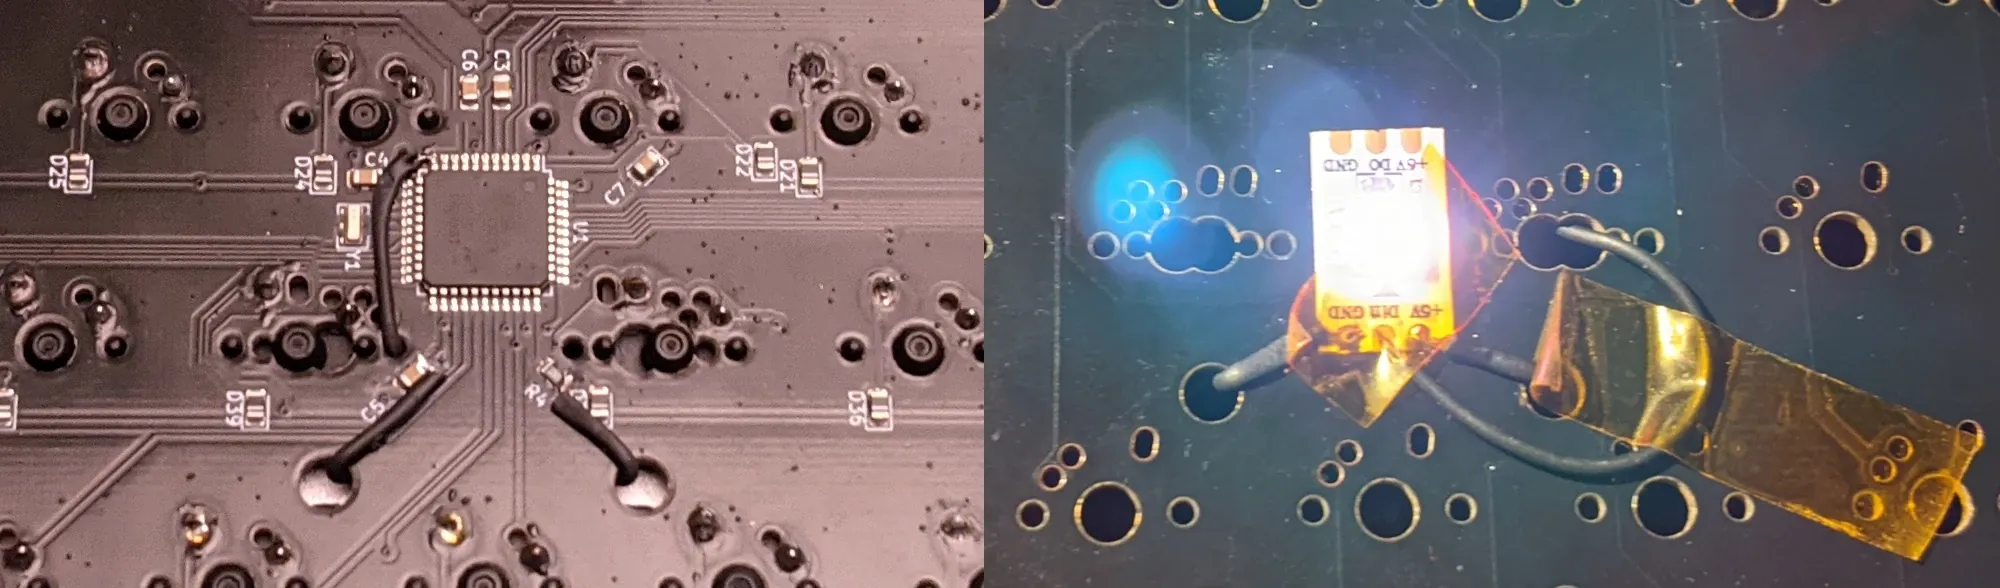
I added a semi-translucent band aid on it to diffuse its light and make give it a smoother appearance.
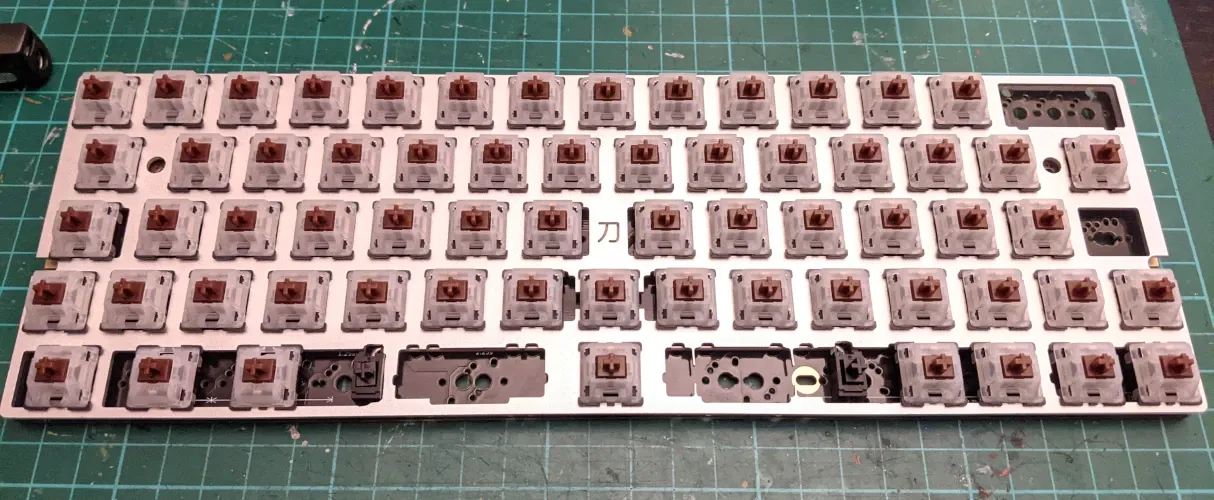
Assembling the keyboard
Once all pieces arrived home I started to assemble the keyboard. The Katana60 allows the keys on the lower row to be distributed in different ways: a single spacebar or two split spacebar ways. I decided to set a single spacebar, but the plate didn't work with this layout so I slightly filed some edges. Aluminium being an easy metal to work aided this modification.
The order of assembly is critical in a custom mech keyboard. First the stabilizers are added to the PCB. There are some tricks to reduce their noise which can only be applied at this stage!
After the stabilizers are set, the plate with some switches to align it are connected to the PCB. With the plate on its place one places the rest of the switches, they are anchored mechanically to the PCB by way of simple pressure.
Then the switches are soldered to the backside of the PCB to form an electrical connection between them. Afterwards the whole assembly is placed on the case and screwed together. Finally I placed the keycaps.
But... whoops, due to the katana having quite an uncommon distribution and my decision to use a 2 unit backspace, when the board wasn't designed for it meaned I didn't have the keycaps for some of my keys.
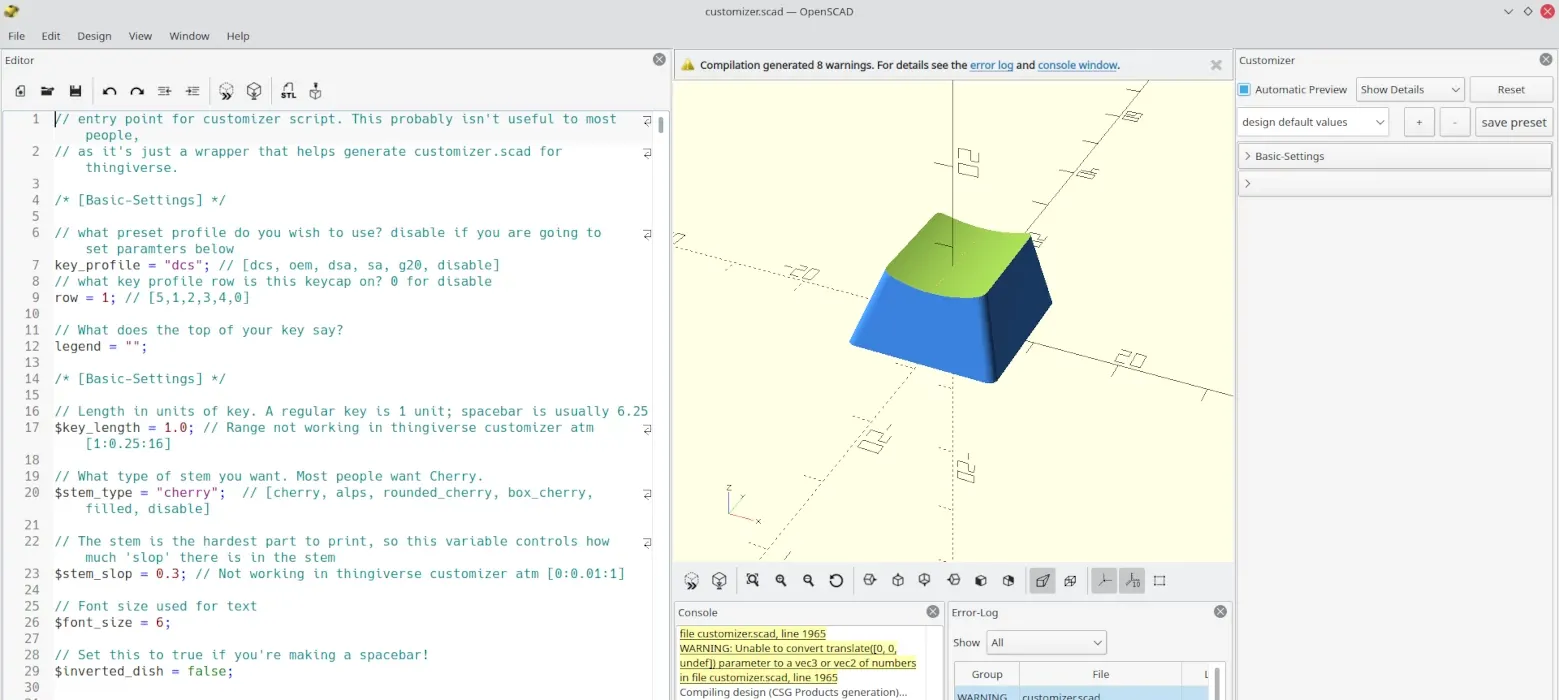
I found this magnificent openscad project by rsheldiii KeyV2. It's a parametric key generator! I specified the sizes of the keys I needed in the program and rendered a model which I printed in 3D. And done, I got the keys I needed to complete my keyboard.
The firmware
But wait! We're not done yet. The keyboard on it's own is a dumb device without function. It needs a firmware in order to communicate with a PC and relay the keys that are pressed.
The Katana 60 can be flashed with the QMK firmware. It's a super-configurable sort of operating system for keyboards. I designed my layout on an online editor, exported it to my PC, added some modifications to make the LED work and compiled it.
After flashing the keyboard with it I had my own Katana 60 V2!

Some final thoughts
After a year of using the Katana 60 I'm still delighted by it. I love the feeling of mechanical switches and the keyboard's layout, although I'm not using it correctly.
I don't think I'm missing out on having more keys, the Katana's distribution and my custom take on it are more than enough to cover all my use cases.
Additionally, having a small keyboard allowed me to place the mouse further to the centre of my desk, reducing the travel distance from keyboard to mouse.
Thanks Rominronin for such an incredible design!