Integrating with ESPHome and Home assistant - Utsund revisited
Could my smart Utsund string light get better?

If you've read some of my older posts you'll know I hacked an IKEA string light in order to control it remotely with my smartphone (or any other device with a web browser). In the past few years home automation has bloomed rapidly and every appliance is now smart. And at the same time ope source alternatives to closed appliance control systems have appeared under my radar. One of the most well-known systems is Home Assistant also known as hassio.
Home Assistant
Home assistant is an smart appliance control system you can get in different forms, as a service you install on a linux box, docker container or a Raspberry Pi distribution. I got it this last way, just simply burn a microSD card following the well-written instructions and pop it in a spare Raspberry Pi.
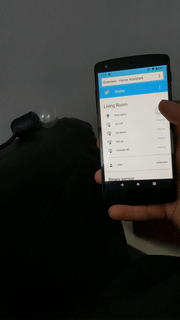
After the system boots you can set up and use hassio through a web interface, the UI is generally pretty intuituive and easy to use. Hassio automatically detects some of the smart devices available on the network and offers to integrate them, letting you take control of your aplliances in a centralised way.
ESPHome
My utsund hack was a homebre solution, there was no way I could connect it to Hassio without reading its documentation, developing a firmware for the NodeMCU that controls it and setting everything up. Luckily for me a bunch of other people went this way before and created the ESPHome project.
ESPHome is a framework that let's you configure an ESP-based device (like the NodeMCU) through YAML files and generates a firmware image based on that configuration. The process is totally automated, the ESPHome CLI tool, downloads its toolchain and dependencies, converts the YAML code to whatever intermediate language it uses and finally compiles a firmware that it burns on the NodeMCU. It even offers you to do over-the-air updates!
The documentation is pretty extensive, but the organization lacking. Finding a way to reproduce what I already had donde for the Utsund string light was a bit cumbersome, but once I found the right documentation pages setting the YAML file up was a breeze.
esphome:
  name: ikealights
  platform: ESP8266
  board: nodemcuv2

# Enable logging
logger:

# Enable Home Assistant API
api:
  password: "super-secret-password"

ota:
  password: "even-more-secret-password"

wifi:
  ssid: "An IoT network"
  password: "thenetworkspassword"

  manual_ip:
    static_ip: 192.168.50.100
    gateway: 192.168.50.1
    subnet: 255.255.255.0

switch:
  - platform: gpio
    pin: D2
    name: "Ikea lights"
I had to define the pin where I had connected the MOSFET which controls the power flow and set up the networking. And that's it! When the NodeMCU connected to my WiFi network hassio offered to add it to its system. From there on I had a switch on the hassio interface to turn on or off the lights from my PC or smartphone!
Automation with hassio
Having integrated the utsund light string with hassio I couldn't leave it at that, hassio offers incredible functionality to make your life simpler. One of those features is automation. Automation routines let you link actions to triggers.
In my case I created an automation to turn on the light string when the sun sets, and turns them off at certain fixed time at night. I also tried out an automation to turn the strip on or off by reading an NFC tag, pretty useful if you want to avoid opening the app and pressing the button yourself.